Friday, October 14, 2011

Ring Bearer Bag

What to do with a ring bearer that is 12?  Well, in my opinion he would look and feel silly carrying a pillow.  Yah, that's a no go.   We went back and forth, looking at ring bowls on Etsy; way cool but not quiet right for us.  We searched endlessly for the right option.  And mom came to the rescue once again.  She had a bright idea, so it took come convincing but in the end I let her run with it.

And look how marvelous "IT" is...


The top decorated layer, flips up revealing a pocket which holds the rings nice and securely.  The saying "Rings for a Champion and his Trophy" was an inside joke and affectionate thing my soon to be husband and I have.  I'm his trophy,  but you only get trophies if you are a champion.  So he is my Champion!  :)  He didn't see this Ring Bag before his son handed him the bag at the alter,  we were hoping it would make for lots of smiles and giggles from him.  Honestly, I was so caught up in the moment, I'm not sure of his actual reaction, guess that's how thing go.  His son carried this in his pocket.   But what did he carry to keep him from fidgeting and looking uncomfortable.  What else but another mommy-made sign.  We love SIGNAGE!

One side for walking down the aisle before the bride...


And one side for the walk back up the aisle, in front of the newly married couple...


Mommy did good!  Plus my wonderful ring bag is small enough, I can easily keep it as a keepsake; without cluttering my life.  Go, Mommy, Go.

Official Wedding Photography by Mandy Ballard

Wednesday, October 12, 2011

Vintage Hankies

Oh My Gosh!!!  This is my most favorite thing.  Well almost my most favorite thing,  there are lots of things in my life, that get me all wound up.  This is WAY WAY WAY up there though.  "Vintage Hankies" of all shapes, colors and uses.  They are such a wonderful creative addition to just about everything.  I wish I would have used them more in my wedding, by making a cohesive theme of them.  However, I didn't come across the idea until my wedding planning way too far along.

Here are some great ideas I wish I would have had the chance to utilize:

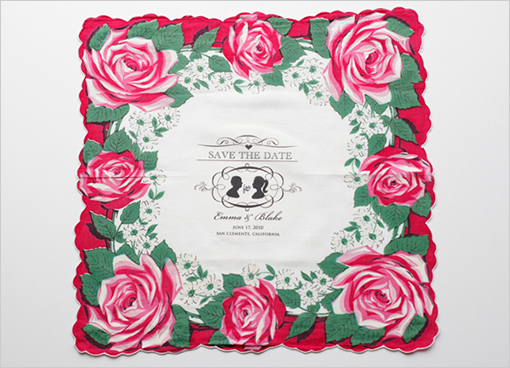
Save the Dates thanks to The Wedding Chicks:


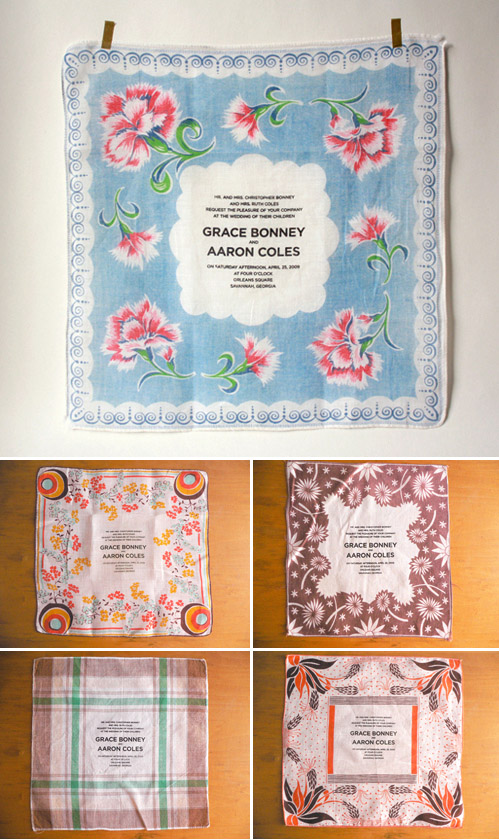
 or even Invitations thanks to June Bugs Weddings:


Napkins maybe, from Joielala:


Plus, I like Hankie Banners, Placemats, Coasters, everything really...

No, not for me, not this time at least!  I'm sure I'll be trying to blend these ideas into my life in the near future.  But, I couldn't live without "Tears of Joy."  All over weddingbee are wonderful ladies praising the glory of this wonderful idea.

First, I bought lots and lots of hankies on ebay.  I bought only "lots" which basically mean large bulk hankies,  I tried to find ones from old real estate auctions. I didn't care if they said they were "well used" or "for crafting."  I got so excited everyday when I would see my next lot of hankies delivered in the mail.  It was a true surprise to see what I would get inside.  I ordered about 200 hankies for my wedding of about 100 guests.  This way, I could sort out all the ugly and stained specimens.  I only wanted fun hankies and found it cheaper to buy in bulk risking getting some ugly ducklings along the way.  I ended up using about 100 hankies, and ended up having about 40 over after the wedding.  The men didn't partake in the hankie fun, but some girls got excited and had to have more than 1. :)

I machine washed and dried my hankies, throwing out the truly holey and ruined hankies.  This is the result, hanging in my parents back yard.  My test hankies!  Oh, I got so excited!  So So excited!!!


Colorful, floral, vintage, unique, just what I wanted to surprise and bring a sentimental touch to my wedding.  I ironed the hankies.  My mom made another sign!  This one to tell our guests to take a hankie for their "Tears of Joy".  I found a lovely corner which all the guests would walk by on the way to the wedding, from which to hang my touching tear rags. 

And for a final touch, I dyed some of wooden clothespins with RIT dye green.  A lovely finishing touch.


I really like how it turned out and got lots of compliments from the guests.  It's apparently a totally unique and creative idea; well at least for those who don't read wedding blogs obsessively, hahaha

Update:  Do you wanna Upcycle your Hankies post wedding.  Here is a great idea for incorporating Hankies into your decor.

Official Photography by Mandy Ballard

Sunday, October 9, 2011

Burlap Favor Bags

To continue the nature theme of the wedding; I decided to go with Burlap Favor Bag filled with flower bulbs.  This way the guests could return home and plant a little piece of the wedding.  This of course only worked for our domestic guests; but I figured the international guests would forgive us, they wouldn't be able to take their bulbs with them. :(

I followed this wonderful tutorial from Christina on Intimate Weddings:  http://www.intimateweddings.com/blog/diy-favor-bags-peony-pockets-part-one/
 
My mom made this last minute sign to hang above the bulbs!
 
 
My mother also worked some DIY screenprinting magic, and the look came out with a perfect vintage and rustic feel.  "Love Blooms" What a perfect saying for the favor bags,  :).   Then, I used some left over paper from the invitations to print tags on my ink jet printer.  The top vellum piece thanked our guests for coming, and the lower green card stock had planting instructions for the bulbs. 


It ended up being a pretty big project in the end; cutting, sewing, printing and running string closures for all these bags was quite time consuming.  We were glad we started about 5 months before the wedding!

Official Wedding Photography by Mandy Ballard

Saturday, October 8, 2011

Burlap Banners

Burlap banners = my first time to touch a sewing machine.  And what a good project to get started trying out my "mommy homemaker" skills.

With some wonderful crafters on Etsy being my inspiration I set off on my DIY project.  It was actually pretty easy.  1) cut burlap into triangles, 2) surge the edges so they don't unravel, 3)  iron them flat if they are wrinkled, 4)  paint on the letters, using homemade templates, 5) fold & sew the top of the triangle around some jute twine/rope and back onto itself; sew so the letter can move back and forth.  Yep, Easy.  The hardest part is cutting triangles out of the burlap (burlap is hard to cut in a straight line).  Really really hard.

Homemade templates:  Keep it simple.  I blew up the letters in Microsoft word to take up most of a regular sheet of printing paper.  Printed.  Used my X-Acto knife to cut out the letters.  TaDa, a homemade template.

And this is the results!


 Smiles all around!  Just how I imagined they'd turn out.  :) :) :)

And my first sewing machine adventure is a success. Only some loud yelling at the spools and continual needle threading was involved. hehe.

Photography by Mandy Ballard

Mason Jars Stole My Heart

Some of the glorious uses of boxes and boxes mason jars I found in my Grandma's storage this year.

Lights to accent the Stairs...


As accents for the Aisle...  I used chalkboard paint to give them the matte black accents, and they match my awesome lanterns that we mixed in.


As a backdrop for the Bride & Grooms table...  (Scattered through the woods, behind the rest of the fairy lights)  This is when my wonderful maid-of-honor is giving her speech.  She made a funny joke, about when we met in college.  You have to use your imagination.


Yep, the lovely lady above you is my MOH,  :)  Notice all the pretty lights, hehe.

Thanks for enjoying my mason jar fetish with me.  Hope you enjoy it as much as I do.

Photography by Mandy Ballard